DIY Fabric Origami Butterfly Tutorial
⌨️
It’s super easy to make simple origami butterflies for hair clips, rings, home and fashion decor. If you were asked about your favorite insects, butterflies would be one of the top choices. Whether children or adults, we tend to love butterflies. I share a lot of butterfly crafts on our website. The DIY Butterfly Nail Art Ideas collection is perfect for nailing in the spring, and the beautiful butterfly cake designs are full of surprises for any party treat. The magical floating butterfly lantern is another one you will love to make with the kids. You can stitch the two squares together as shown, or just use a nice fabric like crochet or lace.
You might like: Quilted Butterfly Pot Holder Sewing Pattern
Material:
- fabric rectangle
- glass needle
- sewing needle and thread
A few glances:
how:
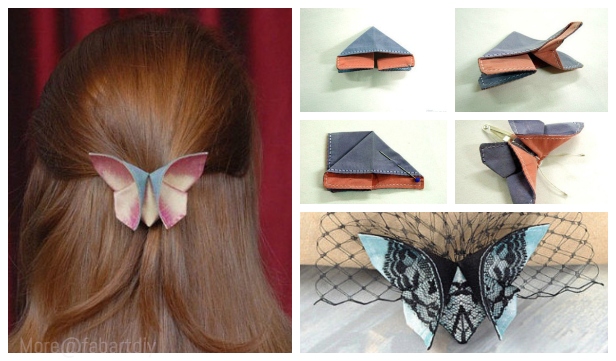
Fold the short side of the rectangle in half.
Fold in half again, pressing as you go, and keep adjusting the work at each step to check that the corners match.
With the folded edge of the rectangle facing you, lift the left corner and fold it to the lower right corner. This should form a triangle.
flip. Your fabric shape should now look like this. Flip your piece over and lift the rectangle so it points upwards. Press the folded left corner of the rectangle to the lower right corner. This will create another triangle. Make sure the lengths are aligned.
Now you have a triangle and two small rectangles below it. Start with the right rectangle first, turn the lower left corner inward, and fold a diagonal line over the rectangle, from the upper left corner to the lower right corner.
Do the same for the left rectangle: turn the bottom right corner inward, and fold a diagonal line over the rectangle, from the top right corner to the bottom left corner. With the vertex of the triangle pointing to the left, fold the top right corner towards the vertex of the triangle. What you folded along the diagonal corners of the rectangle now becomes the body of the butterfly.
Do the same for the bottom corner: fold the bottom right top layer toward the triangle’s apex. Pinch the bottom corners to secure the body and stitch in place with needle and thread.
Don’t forget to share with your butterfly-loving friends below:
Check more articles in our categories DIY Home & DIY Projects ou encore Tips & Crafts .
Thanks for visiting we hope our article DIY Fabric Origami Butterfly Tutorial
, don’t forget to share the article on Facebook, twitter and e-mail with the hashtag ☑️ #DIY #Fabric #Origami #Butterfly #Tutorial ☑️!