Pallet Dog House-Step by Step Plan ⋆ DIY Crafts
🖥️
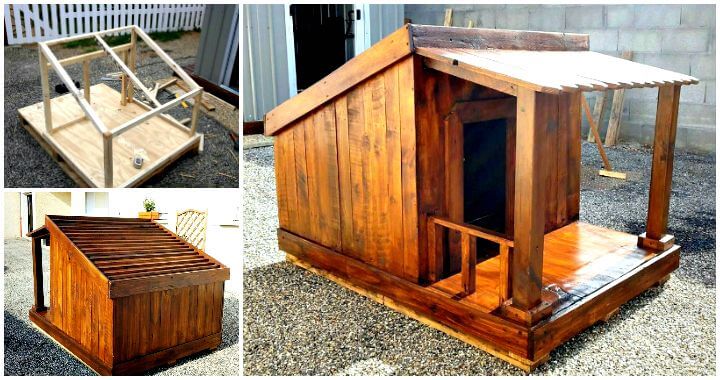
Dogs like to live with humans, which shows their sociality! This is why dogs are the most adopted pets! Many of us have different breeds of dog pets! If you also want to have a friendly dog as a pet, then perhaps the first need is to own a dog house! Avoid buying dog houses, use pallets and other free wood to build the same luxurious dog house at home!To help you understand how easy it is to build a pet house with pallets, we have brought this here DIY Pallet Dog House Step-by-Step Tutorial Guide you through all basic and complex construction steps. First start to build this dog house by making a base. Choose an uncut solid tray as the base and cover it with plywood to make it look smoother!
Keep in mind the size and dimensions of the dog house, and use pallet slats to build the basic skeleton will include solid columns and beams! Finish the frame by using more pallet wood filled with solids, and don’t forget to apply stain coating for better vision and weather protection! If you want more dog house designs, you can also try these free dog house plans, which include step-by-step instructions, guides and pdf plans.
Take a complete pallet board and combine it with the plywood overlay for extra smoothness! The size of the plywood must be equal to the size of the selected pallet board!
Now make room for the front balcony and place a raised wooden border around the rest of the base, as you can see! Carry measuring tape and angle ruler with you to increase the accuracy of your work!
Decide whether you want a sloping roof or a raised balanced roof! All you need is to shorten the length of the rear pillar to the desired extent! On the other hand, make the back pillars as high as the front pillars to get a balanced flat roof! It is recommended to use a sloping roof because it has additional benefits, such as it does not allow rainwater to be retained!
After determining the roof design, use durable wooden beams to connect the rear column to the front column! Use one more in the middle to ensure the robustness of the roof!
After ensuring the stability of the dog house frame, install it next to the balcony pillars and use wooden beams to connect them to the roof pillars! Looking around, get a thicker wooden length from the home to use as a front balcony pillar because it needs more stability!
It will be important to do little things here. The small square bracket under the column brings a sense of fashion to the whole design!
Make sure you have all the accessories correctly! After you are satisfied with the joints, do some inspections and start dyeing the dog house frame!
By providing an extra layer of wood length, the thickness of the side and rear beams is doubled! These extra wooden brackets should have a little extra size to cover the corners perfectly!
After adding additional brackets and cross supports, start filling the sides and the entire frame with directly removed pallet planks!
Starting from the lower back, fill the entire frame entity, except for the front balcony! Determine the size of the front door and reserve unfilled measurement space!
It’s time to use a tiled roof! Starting from the low back, start to lay the pallet slats flat like stair steps! Finish it when you reach the top!
Pick up the stain bucket and tools again and start dyeing the shingle roof! Apply as many coatings as you have applied to the rest of the design!
The next step will be the side trimming of the tile roof! ! Choose more pallet slats and adjust their size to fit each side of the sloping roof!
Trim the edges of the passage and try to get neat!
Install the entrance frame and the side fence wall of the balcony! It is easy to plan using disassembled pallet slats!
After adjusting the size, build a balcony roof or shelter by placing the flat slats one by one! Keep the front edge of the balcony roof V-shaped like a wooden fence! This will bring a prominent and artistic atmosphere to the entire design!
You can also dye it well on the roof of the balcony and give it to your dog!
A perfect doghouse or pet house that can be built by hand! !
The explosive good news is that you will get it with zero investment! This is all a wallet-friendly pallet project! !
Don’t forget to seal the wooden surface after dyeing to get the necessary gloss and crystal removal as well as long-lasting weather and waterproof protection!
Add this precious dog house to your weekend DIY project list and clone it for your pet friends! It will also become an ideal house for cats!
Check out our selection of PVC dog beds to make cheap custom, handmade and comfortable beds for your dog.
DIY dog bowl rack: In this article, we have published 20 outstanding DIY dog bowl rack ideas made by creative DIY enthusiasts.
Made by L’atelier de la palette – idees, déco, manufacturing, vente
Find more articles in our categories DIY Home & DIY Garden ou encore Tips & Crafts .
Thanks for visiting we hope our article Pallet Dog House-Step by Step Plan ⋆ DIY Crafts
, we invite you to share the article on Facebook, instagram and whatsapp with the hashtag ☑️ #Pallet #Dog #HouseStep #Step #Plan #DIY #Crafts ☑️!