How To DIY Cute Paper Baskets For Storage Or Gifting
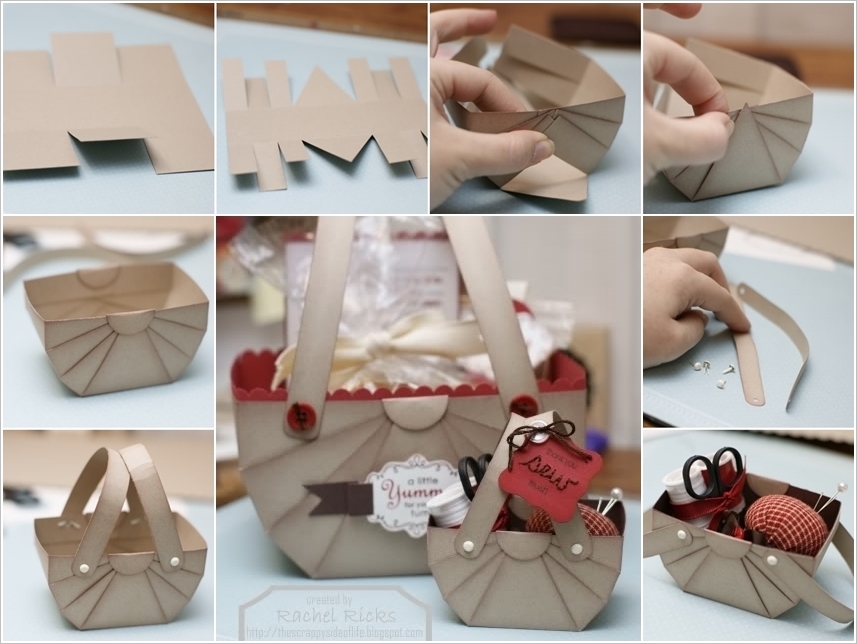
This is a simple and cute paper basket that can be used for home organization or special gift delivery. To make this basket, you’ll have to cut out 6×6-inch pieces of cardstock at 2 and 4 inches. Turn it around and score again at the same size at 2 inches and 4 inches. Cut on the 2″ and 4″ lines as shown. Cut the middle into triangles and each side into thirds. Cut down and cut the lengths of the two strips on the outside on both sides. Start putting the flaps together as shown, and finally put the triangular flaps on top of them. Glue the folded circles to the flaps and a basket is ready. You can also attach two straps with brads for handles and paper flowers for decoration.
Materials you may need:
- 6×6 square car paper or name brand paper
- 2 1/2 x 6″ cardstock or name tag strips
- scoring tool
- Scissors
- 1″ round punch
- Fillet machine
- 4 brads
- Adhesive
If you want to do it yourself, you can read more from this link:
The Minor Side of Life – Cooking on Mondays… a little late
Check more articles in our categories DIY Home & DIY Projects et Tips & Crafts .
Thanks for visiting we hope our article How To DIY Cute Paper Baskets For Storage Or Gifting
, we invite you to share the article on Facebook, pinterest and e-mail with the hashtags ☑️ #DIY #Cute #Paper #Baskets #Storage #Gifting ☑️!
Comments are closed, but trackbacks and pingbacks are open.