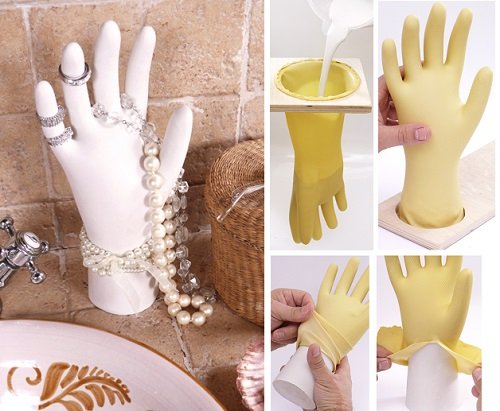
How to DIY Plaster Hand Jewelry Holder
Today I’m going to introduce an easy jewelry rack idea that you can use to decorate your home. This will help you organize your jewelry in a very simple and beautiful way.
Materials you need:
- 1 kg plaster of paris
- A pair of durable rubber gloves
- 20 x 30 cm of wood
- a cup
- pencil.
direction:
Use glass and pencil to draw a circle on the board, then use a drill and cutter to cut the circle. Finish the edge of the hole with sandpaper, then place the glove into the stapled hole (use a stapler). Now prepare the water and gypsum mixture. Use the other glove to measure how much water you need. Put water in a bowl and sprinkle plaster over it. The mixture was still stirred. Let’s set it up for another minute or two. Mix with a spoon or spatula, moving gently and slowly from side to side. The composition is neither runny nor fat. Pour the mixture into gloves and let it harden for 48 hours. Finally, you can break the glove to remove it more easily. You can paint or paste a pattern on it if you want, right?
Check more articles in our categories DIY Home & DIY Projects et encore Tips & Crafts .
Thanks for visiting we hope our article How to DIY Plaster Hand Jewelry Holder
, think about share the article on Facebook, pinterest and e-mail with the hashtags ☑️ #DIY #Plaster #Hand #Jewelry #Holder ☑️!