DIY Salt Dough Magnet-5 Minute Crafting Ideas
There are many reasons why the kitchen has become a favorite place in my house.These DIY salt dough magnet Just make it more interesting for us! Not only do my family spend most of their time in the kitchen, but the warm natural light makes it look amazing at all times-whether in the morning, evening or afternoon! We have a lot of special memories in this place-playing UNO family cards on the kitchen counter, eating healthy food, and what else! My house is currently being renovated, so I decided to clean up my refrigerator!
When I cleaned it up, I decided to do something I encountered on Pinterest a few days ago! The salt dough magnet is not only super easy to make, but also super fun! Due to the renovation, my children and I were trapped in the kitchen, so we decided to make some salt dough magnets! I decided that this would be the perfect time for the much-needed close interaction with my children! We looked at the supplies, wrote on a piece of paper, and headed to the market!
1. Collect supplies
- Salt – 1/2 cup
- All-purpose flour – 1 cup
- Cold water – 1/2 cup
- Rolling pin
Due to these renovations, my house is a mess, which is why I can’t find my rolling pin! All the house stationery was packed, so we decided to buy more from the market-this also gave us an excuse to buy ice cream!
2. Mixed materials
I first mix these three ingredients together-salt, all-purpose flour and cold water! The container you want to use should have the appropriate size. If you are handling the dough by hand, please prepare a container large enough to put your hands in it. I don’t have a large container, so I used a small one to mix the dough with a spatula!
Don’t add all the water at once-this will cause the liquid to be mixed instead of the dough. I started by putting some flour and salt in a container and adding water as I walked. I add a little every time, and then stir until I use up all the water!
3. Knead the dough
The kneading time will not be too long-about 25 minutes. Use a countertop so you can stretch your arms easily. Sprinkle the surface with flour, then scrape the dough out of the container. You need to push it down and out until it is super soft! You can add any amount of flour to make sure it doesn’t stick to your kitchen counter, because trust me, removing it is much more difficult than adding more flour!
4. Roll out the dough
This is where the rolling pin comes in! I pressed the dough to about 1/8 inch thick! Use a rolling pin to roll on the dough to make it thin enough for the next step. I had to use a lot of extra flour for this step because the dough kept sticking to the surface when I rolled it out. I used a precise scale and measured the thickness accurately, but you can observe it with your eyes!
5. Cut out the shape
Let’s get to the super fun part-I’m ready to leave stickiness behind! I just chose to keep it simple and just cut out the circles. My kids want to try different shapes, but we don’t have a shape cutter on hand. I just decided to use spice caps, but you can also use water bottle caps or anything that does the job! It can be very fun to try different shapes of knives-I wish I could bring them with me when I cut the dough!
6. Seal them
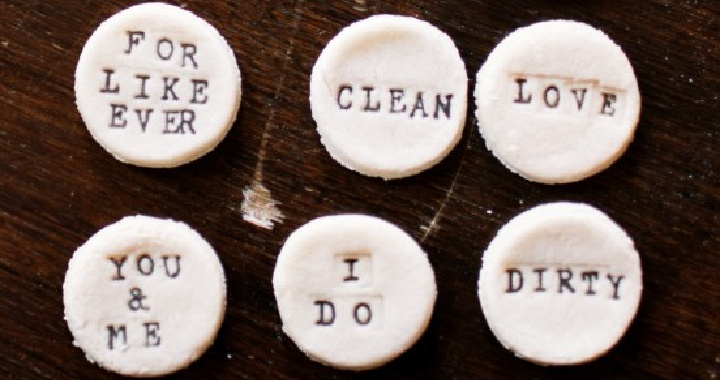
My kids have these stamps, which are perfect for this project! We decided to stamp some magnets and outline them with a marker. They have stamps of all letters, so we spelled out different words, such as “love”, “clean”, “I do” and some other words. It’s fun to come up with these ideas, and when my kids’ ideas are good enough for the project, they feel very confident!
7. Bake your magnet
Baking is the only part you need to do yourself. Keep your children away from the oven! I put all the magnets on a piece of parchment lined paper-this will ensure that they won’t stick to the pan when finished. Put the tray in the oven at 200 degrees for 2 hours! My children were full of excitement while waiting, so I told them to finish their homework and housework. This gives us a lot of free time to process after the magnet is baked!
8. Attach the magnet
These magnets are easy to find in my stationery shop, but you can also order them online from many websites. I suggest you use a hot glue gun to attach the magnets, because they will stay on the refrigerator for a long time! During this process, I used a hot glue gun and kept my child away. Put them together to make sure they stick together correctly. Before attaching the magnet to the dough, make sure to let the dough cool.
9. You’re done!
Isn’t this the best idea? Now, you can connect it to any magnetic surface in your refrigerator or home at will. My refrigerator was a mess before I started cleaning it, and now it looks completely new! These magnets have increased a lot. This is definitely a very useful idea, everyone needs to try! You will like its results.
My husband and I always forget whether the dishwasher is clean, so these two magnets called “dirty” and “clean” are very helpful! They make my life so easy! This is another one that says “Buy”. We visit the market randomly, so this would be great for reminding each other of the groceries we need to buy! Finally, my husband and I have a “forever” in the picture! It adds a wonderful feeling to the refrigerator.
So what are you waiting for? This is the perfect way to make your kitchen feel healthier and more beautiful. You can attach a large number of photos from different trips to any magnetic surface of the house. Your child will think he is super creative and will give you all kinds of ideas. This is just a small but nice detail that can be added to your house.I like this DIY salt dough magnet ideas So many, and plan to make many of them in the future to upload all the photos of precious memories we made!
Find more articles in our categories DIY Home & DIY Garden & Tips & Crafts .
Thanks for visiting we hope our article DIY Salt Dough Magnet-5 Minute Crafting Ideas
, help us and share the article on Facebook, twitter and e-mail with the hashtags ☑️ #DIY #Salt #Dough #Magnet5 #Minute #Crafting #Ideas ☑️!